Did you know you could use iron-on vinyl for baseball caps? And I even found this one at the dollar store, so it was a super frugal project! The trick is NOT using a regular iron or the EasyPress on this one.
I wrote this post before the EasyPress Mini was released. See how I used the EP Mini to decorate a trucker hat.
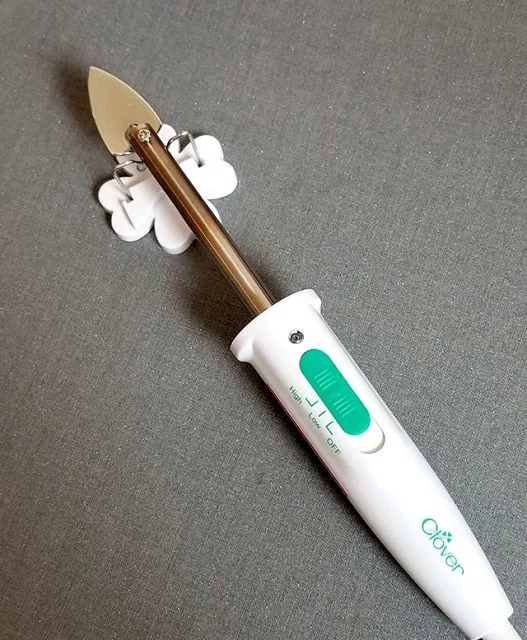
I’ll share my new, favorite, secret tool (a mini craft iron) for applying iron-on to oddly shaped items.
Here’s where to buy the mini craft iron.

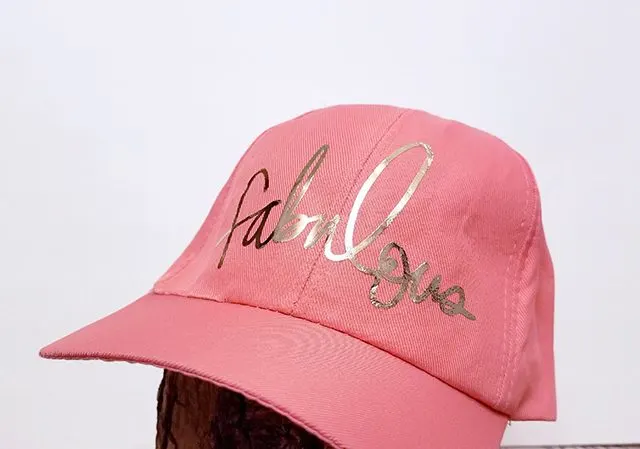
Like I said, I found this hat at the Dollar Tree, though you could find them on Amazon or other places as well.
Measure the area of the hat that you have available to be sure you size your design correctly.
I simply chose the word “fabulous” (You can find it in Design Space by searching “fabulous” 🙂 Make it the right size, send it to the mat and make sure you hit Mirror before cutting.
For more tips, read this post on using iron-on vinyl.
Weed out the extra vinyl and roll up a hand towel to stick inside the hat. This will give you something to iron down against. My first trick is that I used this mini craft iron – plug it in and turn to high heat. Since it has such a small surface, it’s great for maneuvering around the front of the hat.

The second trick is to start ironing in the middle of the design. Make sure the iron-on is positioned where you want it, and then this helps it from shifting. Then move towards the edges.

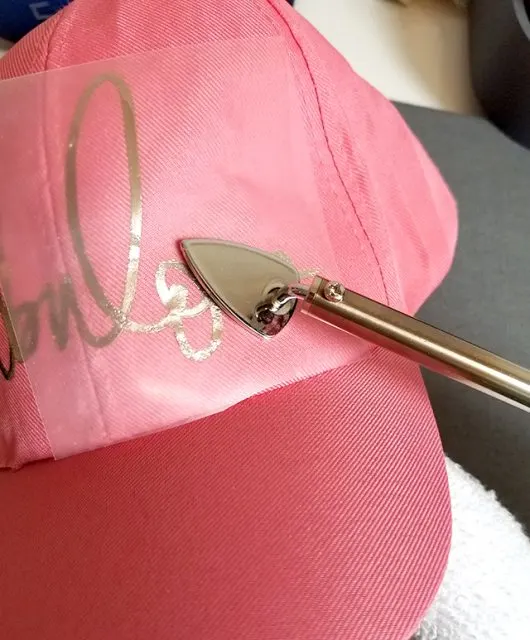
Since the temperature of the mini iron is less precise than the EasyPress, or even a household iron, you may need to do a bit of trial and error with pressing time. But I used the HIGH setting and ironed each section for about 20 seconds.
Again, remember to have the towel pressed on the back side of where you’re ironing to protect your hands from the heat, and to give the iron something to push against.
Since this is foil iron-on, remove the plastic sheet when the vinyl has cooled.
I didn’t do this – but it would be a good idea to secure the plastic carrier sheet with heat-resistant tape while it’s cooling so it doesn’t force the iron-on to start pulling away from the hat.

The shiny gold iron-on (buy some here) was perfect for my cute little pink hat – I hope you’ll make some too! Have any questions? Let me know!
You can also use this same mini iron to put HTV on slippers or shoes.
Nancy
Monday 19th of August 2019
I love this hat. what font did you use?
Stephanie
Monday 19th of August 2019
It was actually a word already designed in Design Space. If you are using DS, just search "fabulous" and it should come up!
Pam Bigham
Thursday 11th of July 2019
Did you use the small tip that came with the mini iron to press the hat or did you purchase a larger tip? If so, which one works best for hats?
Stephanie
Monday 19th of August 2019
I used the tip that came with the iron, not any extra ones. Hope that heps!