{How to make flowers out of sheet music, perfect for wreaths or other decorations}

If you’ve got Christmas crafting on the brain, you’ve probably noticed that sheet music is a pretty popular material to work with. I’ve seen it on ornaments, canvases, picture frames, and today I’ve got a tutorial on how to make flowers with it. I posted this along with a decorated wreath a couple of months ago on Craftaholics Anonymous.
Here it is again in case you missed it, plus I updated the wreath to work for Christmas.
Start by gathering your music. Sometimes you may be lucky to come across some old looking stuff at garage sales, but you can age “new” music with tea (if you want a lot of music, try checking with a school band or orchestra teacher to see if they have any extra that would just get recycled anyway)

How to tea stain: Make a strong cup of tea with a 2-3 tea bags (we don’t drink tea, so I just used the cheapest stuff I could find) When it has steeped and cooled off, pour it into a pan or cookie sheet and dip the sheets one at a time. Set out on paper towels to dry, or even place in a warm oven (do not leave unattended). If you live somewhere that’s still warm outside, that’s an option too.
On to the flowers. Cut cardboard templates at 2.75, 3.75 and 4.25 inches (or something similar…that’s just what I used) and start cutting circles from the sheet music. Each flower needs 2 of each size. (cut 2 or 3 sheets of music at a time to speed the cutting process)
Now cut wavy lines around each circle. Spritz lightly with water and crumple them up. To speed the drying process, place on a cookie sheet in the oven at 275 for just a few minutes. When dry, the paper will be quite stiff. Smooth them out just a bit and layer the 2 large then 2 medium then 2 small, securing in the center with a brad (I had to poke a hole through the layers with a nail first, the brad wasn’t strong enough to do it)
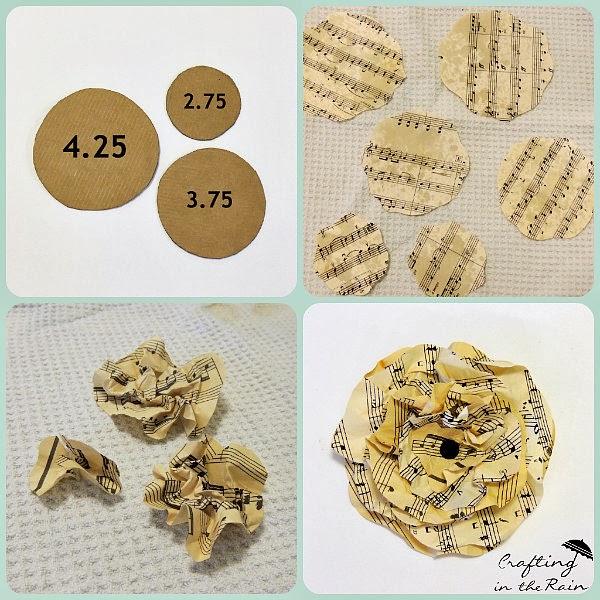
And now you’ve got a fluffy little music flower to put on your tree, a present, a candle (preferably one that is electric or won’t be lit 😉 or a wreath like this one. The little banner says “cheer” but the glitter letters are hard to read in the picture.

As always, let me know if you have any questions, and I’d love to see pics if you make some! Leave a link here, or on Facebook, or tag me on Instagram. Have a great Wednesday!
