• About
  • Contact
  • Shop
    • Facebook
    • Instagram
    • Pinterest
    • YouTube
  • Crafts
    • Disney
    • Kids
    • Sewing
  • Holidays
    • New Year
    • Valentine’s
    • St Patrick’s
    • Easter
    • Mother’s and Father’s Day
    • July 4th
    • Halloween
    • Thanksgiving
    • Christmas
  • Cricut
  • DIY
    • Cleaning
    • Organization
    • Projects
    • Scroll Saw
  • Downloads
    • Printables
    • SVGs
  • Recipes
  • Life
    • Family
    • Fashion & Beauty

Crafting in the Rain

Sweater Hat Tutorial–Kind Of

Sewing

This post may contain affiliate links. As an Amazon affiliate, I earn from qualifying purchases. I receive a small commission at no cost to you when you make a purchase using my link.

5 Feb 2012
  • Share
  • Tweet

I had several requests for instructions on how I made my hat out of a sweater. To be honest, I wasn’t sure it would turn out, so I didn’t even take any pictures along the way.  Forgive me?

How to make a hat from a sweater


I will give you a few tips on how I did it–


First, read this tutorial by At Second Street

Then, here’s what I did:

Washed the sweater in hot water and dried on high heat to get it to shrink as much as possible. It’s much easier to sew and work with if the fibers are tight.

Cut up a sweater to make a hat

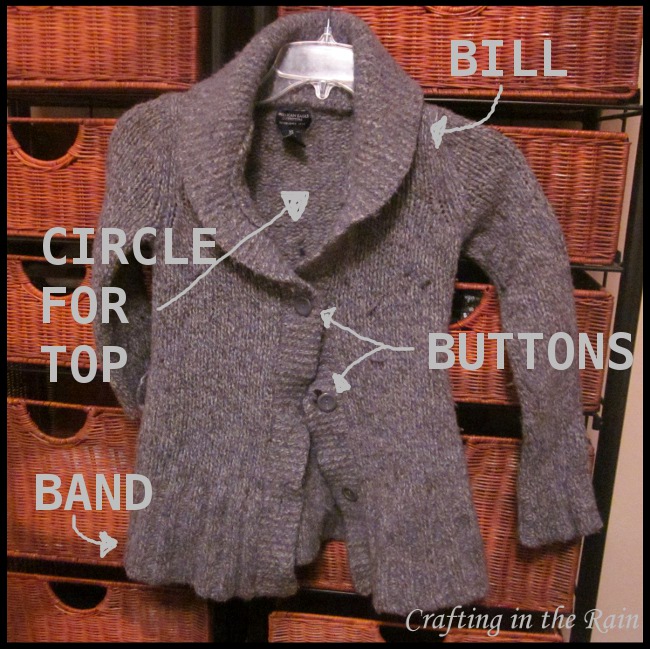
Cut a circle out of the back measuring 6.5 inch diameter

Cut a strip off the bottom of the sweater 22 inches long by 4 inches wide.  

Using a 1/4 inch seam allowance, I sewed the strip ends together to make a band and pinned and sewed that around the circle.  Mine did pucker a little as the sweater stretched a bit as it went through the sewing machine, but you can’t tell too much when it’s on my head.

Make a hat from a sweater


Cut a brim out of the collar of the sweater.  I used the bill template from the other tutorial as a shape guide.  (mine came out to about 8 inches wide, and 3 inches at the part where it sticks out the farthest. I stitched around the bottom edge so it wouldn’t unravel.  I didn’t use any cardboard or interfacing (though if your sweater is on the thinner side, it’s probably a good idea…plus then the edges won’t get stretched out in the sewing machine)  Then I pinned and sewed that where it looked good on the hat.  


I took the buttons off the sweater and sewed them by hand to the sides of the hat.

In case you missed the post last week, here’s what it looks like finished.  

How to make a hat from a sweater


Pin It

And there you have it.  If you’ve got a sweater that’s doomed anyway, it can’t hurt to try!  Plus, it will be even cuter because it will be on *your* cute head!

Image Map

Related Posts:

  • Be Kind to Your Mind
  • Decorate a Trucker Hat with Cricut Hat Press
  • Decorate a Trucker Hat

Leave a Comment

« Make a Splash SWEATERS
Why My Favorite Number is 27 »

Leave a Reply Cancel reply

Your email address will not be published. Required fields are marked *

This site uses Akismet to reduce spam. Learn how your comment data is processed.

Hi, I'm Stephanie - Welcome to Crafting in the Rain where I've been blogging about the crafty life since 2011. Read More…

Archives

  • Home
  • About
  • Contact
  • Disclosure
  • Index
  • Privacy Policy

Stephanie Paxman is a participant in the Amazon Services LLC Associates Program, an affiliate advertising program designed to provide a means for sites to earn advertising fees by advertising and linking to amazon.com.

Copyright © 2011-2023 Crafting in the Rain