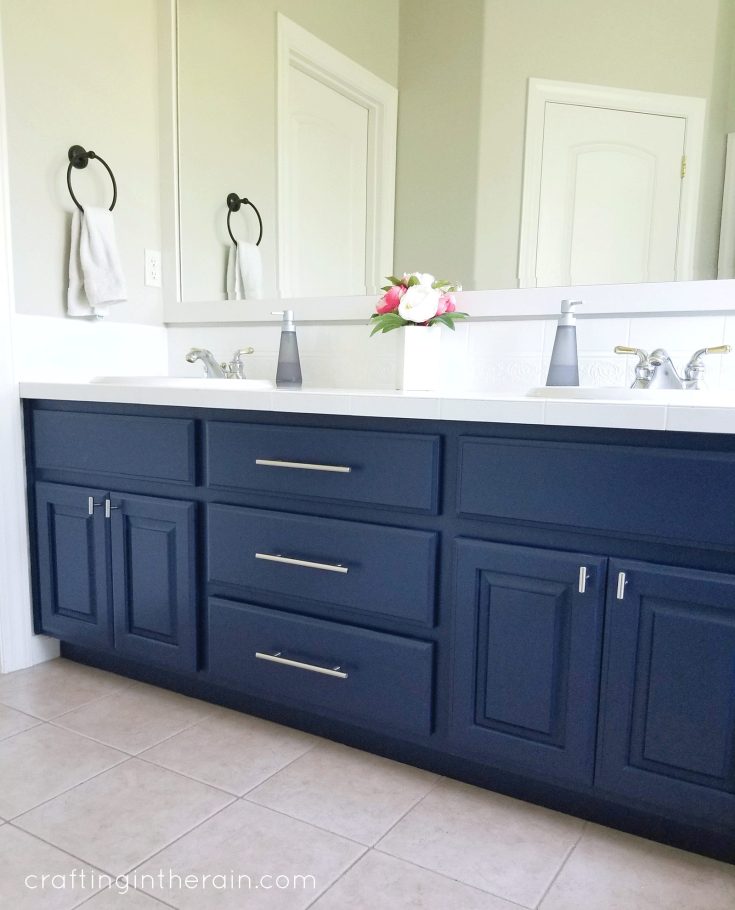
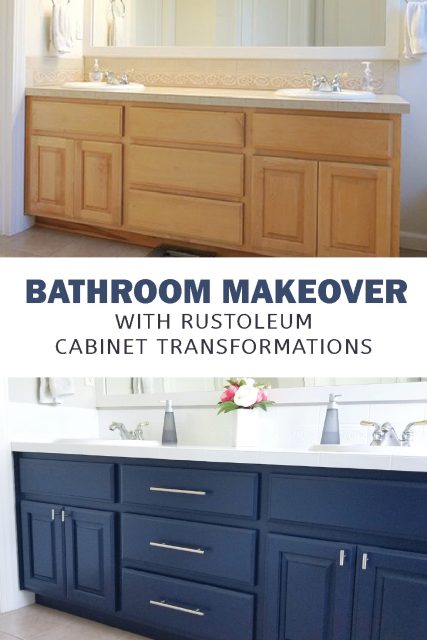
If you follow me on Instagram, you saw some of the pictures I took while I was working on my RustOleum cabinet transformation bathroom project. I love the new look and I’m really happy with how it turned out.
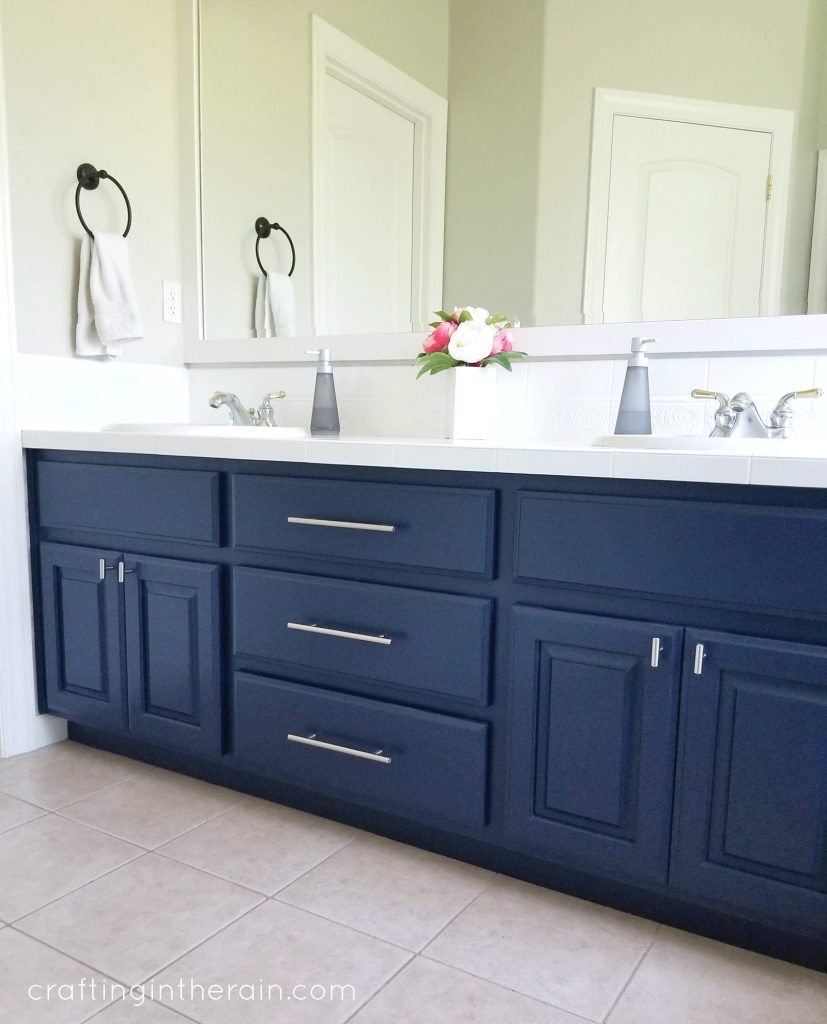

But it’s not perfect (and that’s ok). So I wanted to give you the whole story of how the process was to paint a bathroom vanity with a Rust-Oleum Cabinet Transformation kit. That way you can decide if it’s something you want to tackle a set of cabinets in your house!
I was sent a Rust-Oleum Cabient Transformation kit, and all experiences and opinions are my own.

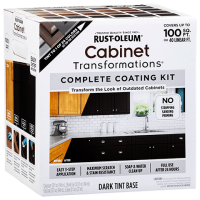
Rust-Oleum Cabinet Transformations kits are available in a light and dark option. You can see the color choices here and here. You can customize the look further by deciding to use the glaze or not. I went with no glaze on my dark navy paint.
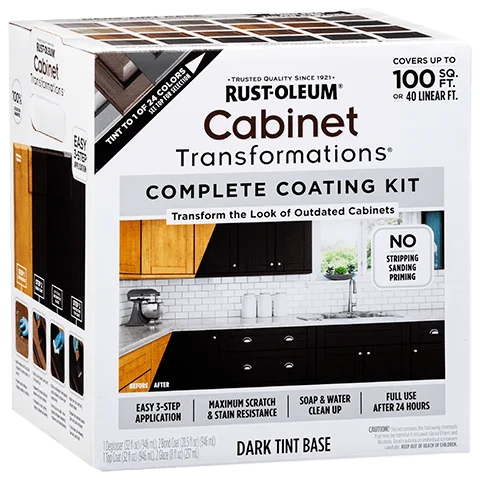
Rust-Oleum sent me a cabinet kit to try, and it arrived tinted in Nightfall, as I requested. Normally, if you go purchase a kit at your home improvement store, you will need to have it colored at the paint counter before you bring the kit home.
You’ll also need to measure the painted area of your cabinets to determine if one kit will be enough, or if you’ll need more. My Rust-Oleum cabinet transformation bathroom used less than half of the kit. But a large kitchen would definitely need more than one.
What’s inside a Rust-Oleum Cabinet Kit
The kit comes with an instructional DVD that you’ll want to watch before starting the project. There’s tons of good information in there. You get tips on how to keep track of which doors and hinges go back where, and the direction your brush strokes should go, for example.
What you don’t get is the hands-on practice. So hopefully some of my tips can help a little bit there.
Supplies needed:
- Kit (includes deglosser, scrub pads, bond coat, glaze, rags for wiping glaze, top coat, stir sticks)
- Gloves
- 2″ and 1″ synthetic paint brushes
- Drop cloth
- Painters pyramids (for propping up doors while painting)
- Painters tape
Prep for painting bathroom cabinets

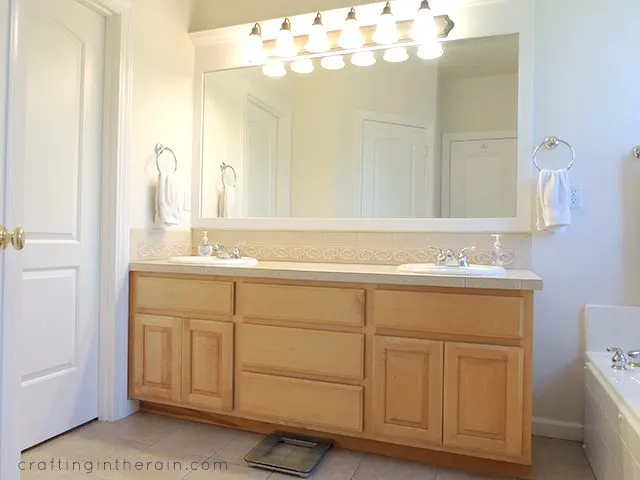
Since I was working in my master bathroom, and our master bedroom is pretty big, I used the bedroom space to set up my painting station. I laid down a plastic drop cloth on the carpet and covered some tables with packing paper.
With only 4 door fronts and 3 drawers to paint, this set up worked nicely and I had enough room.
I really don’t know where I would have been able to set up everything for doing a kitchen job though. Our garage is too full of large tools, and the main space of the house often has kids and a dog running around.
You should be aware that towards the end of the process, when the clear top coat goes on, the recommendation is that it be left alone in a space with no breezes or people moving around for 12 hours because you don’t want hairs and dust getting stuck in the finish.
So make sure you have a plan for space and drying time before starting this transformation project.
Once the painting station is set up, remove doors and drawers from the vanity. Each door and drawer gets a unique number. Sketch out a map of your cabinets so you know where everything will go back to.
Use painters tape and numbered plastic baggies to identify door bags and keep hardware organized.
How to clean cabinets before painting
All surfaces to be painted must be cleaned with the deglosser first. This eliminates the need for sanding, and is especially important for kitchen cabients that likely have more grease and grime than bathroom cabinets.
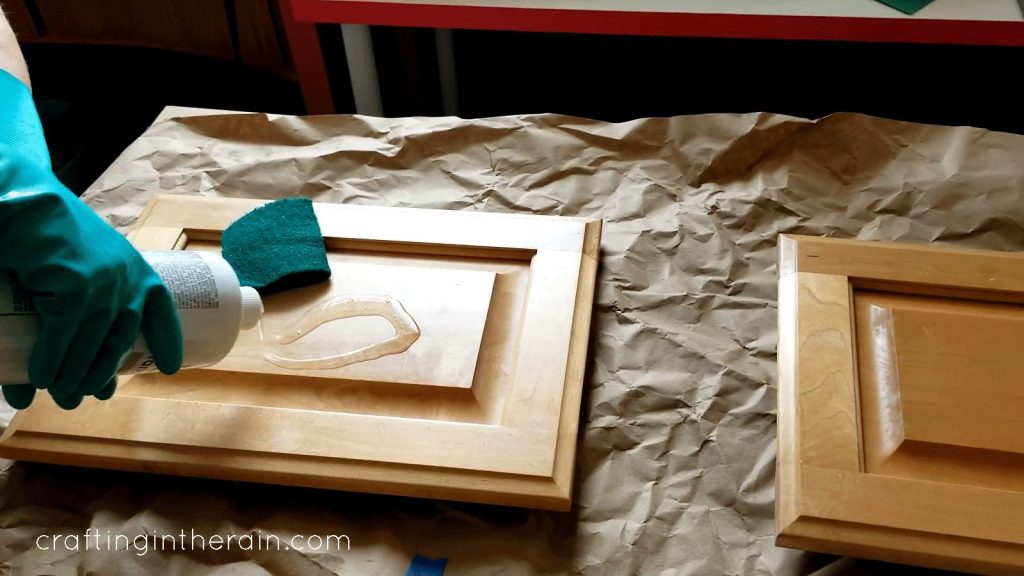
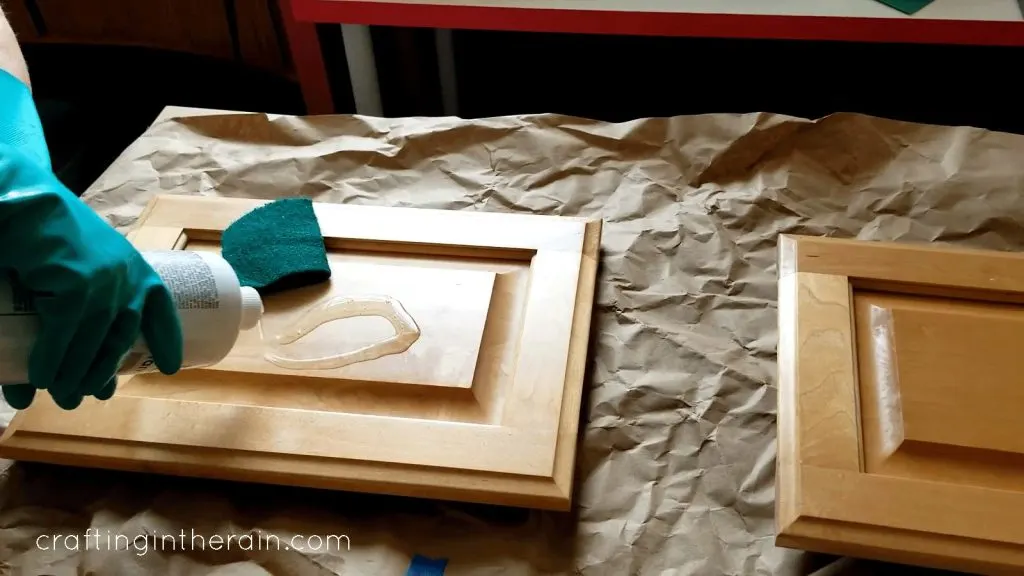
Wear gloves and wipe deglosser (Step 1) on with the green scrub pad that comes in the kit. After the surface is covered, scrub to be sure dirt, fingerprints, grease, etc are removed. Wipe with a damp cloth until any suds are gone. Then wipe with a dry cloth.
Let dry for at least an hour. Tape off walls, floor and countertop if needed to protect from paint. Remember to press down the edges of the tape really well to prevent paint seeping under, especially because it’s a thinner consistency.
Painting bathroom cabinets
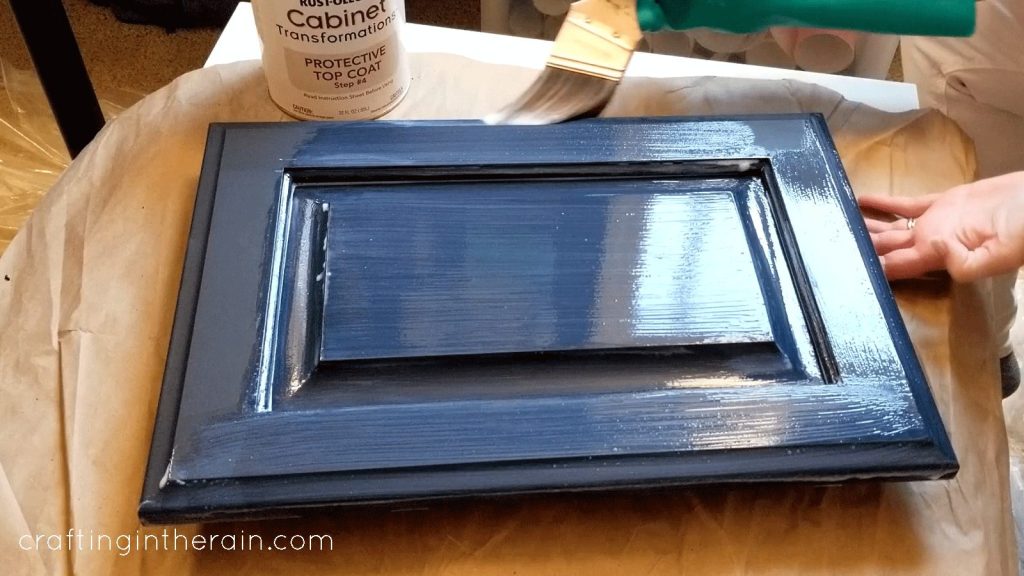
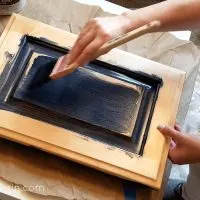
Paint on the first coat of the bond coat (Step 2) – the colored paint. I got pretty nervous at this point as it was not covering well at all and I could see the cabinets right through the streaks.
The paint is a little thinner than regular wall paint. But, I had faith and kept going.

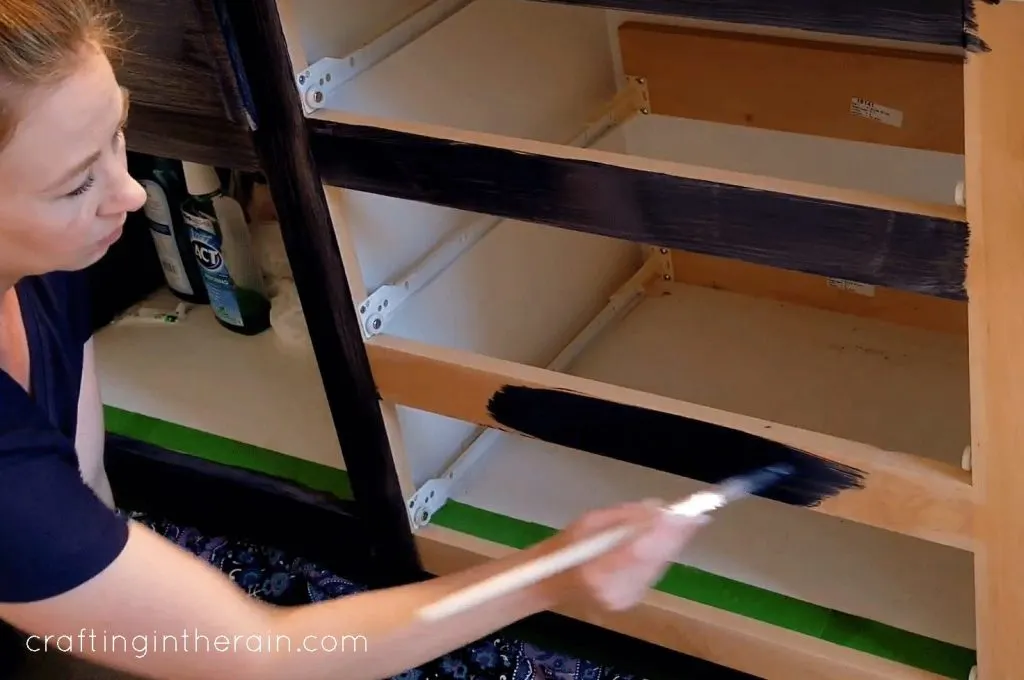
Try to paint smoothly and watch for drips, brushing away as soon as possible. Once it starts to dry just a little, re-brushing will pull paint up from the cabinet. And know that the first coat is going to look bad.
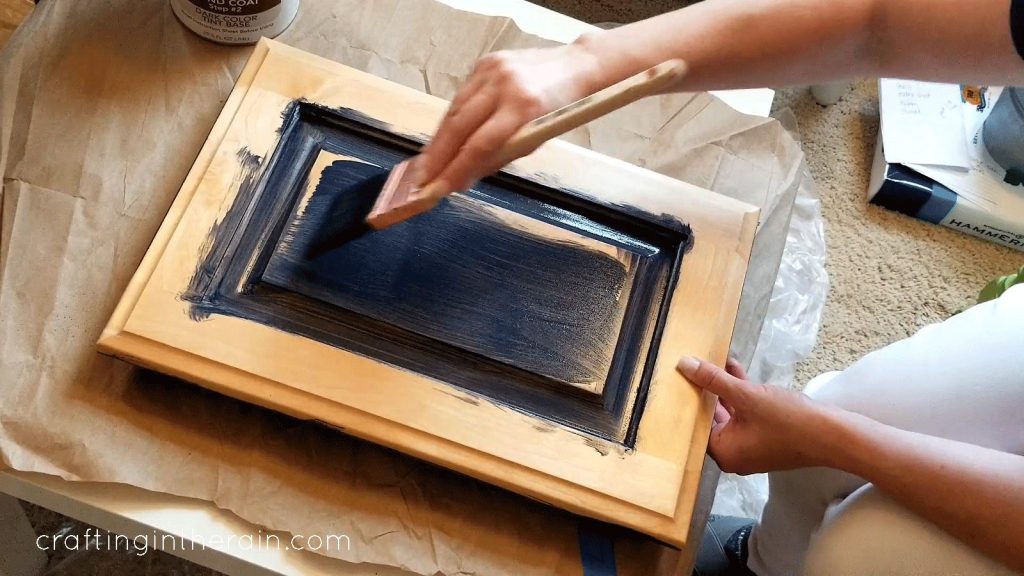

After drying for 2 hours, repeat with a second coat. The instructions say that only 2 coats are needed, but I could still see some of the original cabinet color through a few brush streaks, so I added a third coat after drying again. Three coats provided the perfect coverage.

If adding glaze (Step 3), this is the time to do that step. But I skipped it.
How to protect painted cabinets
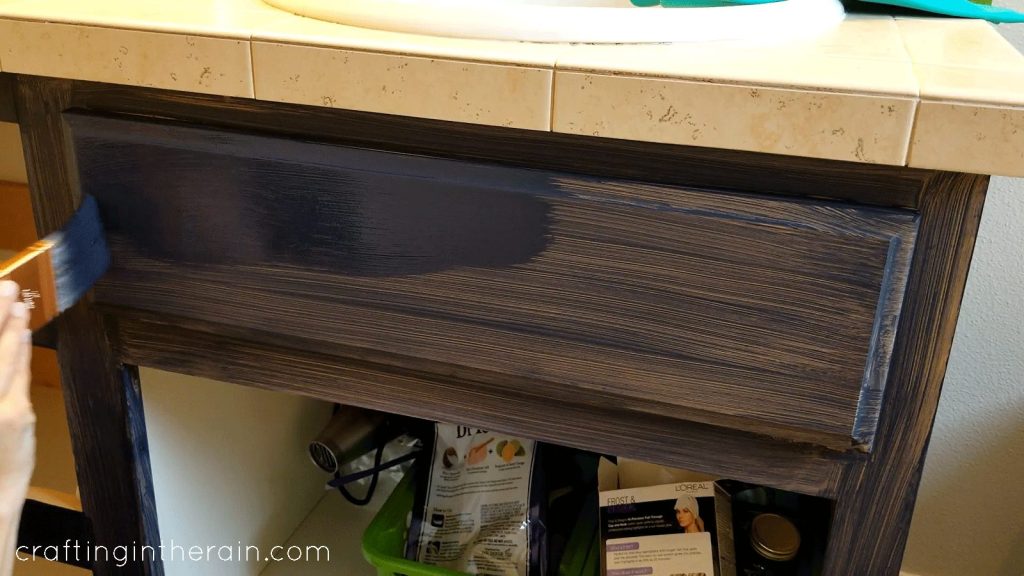
The final coat is the clear, protective top coat (Step 4). This is where I ran into the most trouble, but you can only see the issues now if you look really closely.

Issue 1: This clear top coat will actually dry to a kind of whitish color anywhere that it pools or drips. On the actual cabinet itself, this wasn’t really a problem because everything is flat.
The important part is that everything gets covered evenly so that it has the same satin sheen when it dries. If anything isn’t covered in the first coat, you can add touch-ups, but the area may be noticeable in the right light.
Possible problems with painted cabinets
Issue 2: Cabinet doors. If I were painting these again, I would have a 1 or 1 1/2 inch brush on hand to paint around the raised panel in the middle.
The 2-inch brush was fine for painting all the flat parts, but when it came to the lower and bumpy parts, it just held onto too much of the clear coat.
That led to lots of pooling, lots of trying to brush away drips, and all that “messing” incorporated bubbles which attributed to some of the lighter drying areas later.

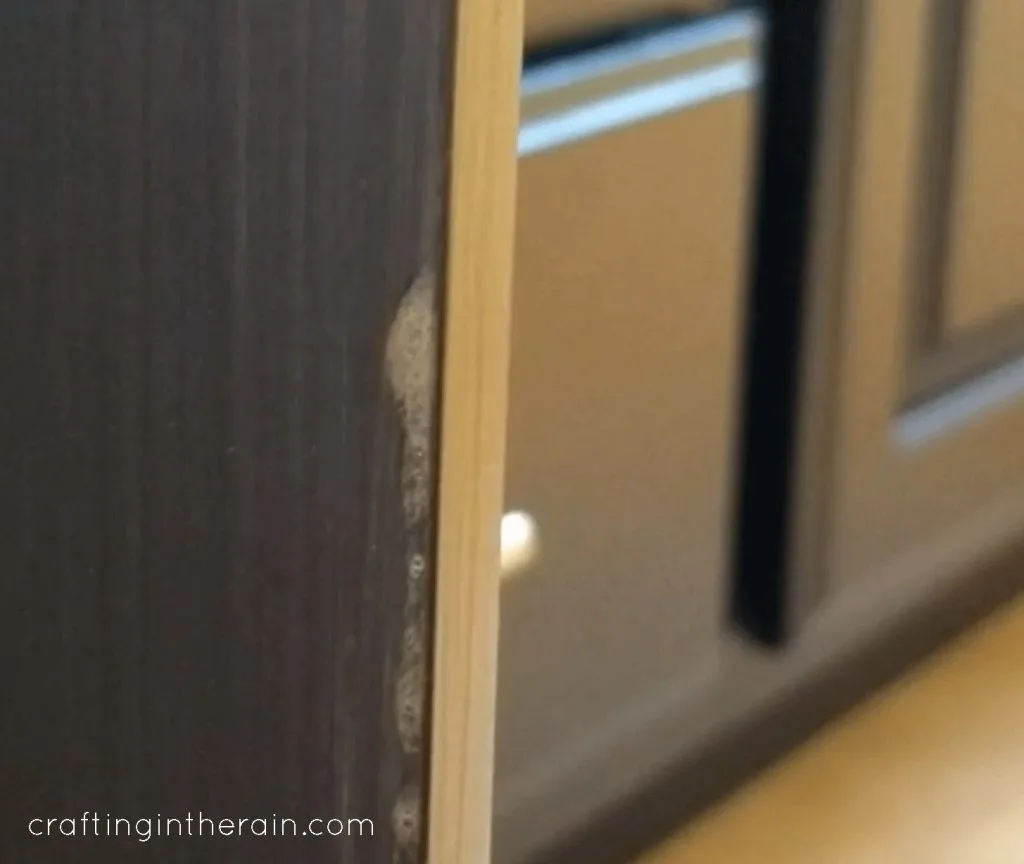
I also had lots of drips that went off the sides and around to the back of the door. Even though I thought I was brushing them away, I couldn’t see where it had actually traveled underneath. So later there were a lot of raised white bumps on the inside parts of the doors.
I should have had a damp cloth to fully wipe under that bottom edge after completing the top coat. Maybe that would have prevented that problem.
I did fix some of these areas by sanding them down a little and adding another blue layer and another top coat layer when dried. But that’s not the ideal solution.
The next time I would definitely like to try using a paint sprayer for both the paint layer and the top coat. The instructions recommend brushing if you’re going to add the glaze, because the glaze kind of settles in the brush strokes.
But since I would probably skip that anyway, it would be nice to try spraying.
After the top coat has dried for 12 hours, hardware and doors and drawers can be returned. I still let everything continue to cure 2 more weeks before adding the new pulls and knobs on. (Partly because I was just putting off finding the door template and drill – ha!)
Cabinet Transformations Kit

RustOleum Cabinet Transformations kit can be used on a bathroom vanity. See how to paint a navy bathroom cabinet for a fresh makeover.
Materials
- Cabinet Transformations Kit
- New Hardware (optional)
Tools
- Paint brushes
- Drop cloth
- Painters tape
- Gloves
Instructions
- Measure cabinet area to determine the number of paint kits needed (this vanity used about half a kit)
- Watch DVD enclosed in the kit for full instructions
- Protect floor and table space from drips while painting
- Remove doors and drawers, keeping track of where each drawer and hinge set came from
- Clean all surfaces to be painted with the deglosser
- Tape around floors and walls to maintain clean edges
- Paint first coat of the bond (colored) coat - it won't cover well, but just try to keep this coat evenly applied
- After drying 2 hours, repeat with second coat
- Dry again and add third coat if needed
- When paint is dry, add glaze, if using - there is no glaze on these cabinets
- Brush on the protective top coat - apply as evenly as possible and watch for pooling and drips which can dry white and cloudy instead of clear
- After 12 hours drying, hardware can be replaced or changed, and the doors and drawers returned to the cabinet
Notes
As of September 2020, this project in my house is one year old and the paint still looks great! No fading, chipping, or scratches. To clean I occasionally wipe with a damp cloth.
Recommended Products
As an Amazon Associate and member of other affiliate programs, I earn from qualifying purchases.

Read this post for how to install new cabinet hardware.
These knobs and drawer pulls were sent to me from D.Lawless Hardware. The finish is satin nickel.
Have any questions about this RustOleum Cabinet Transformations bathroom vanity navy blue makeover? Ask and I’ll get back to you.
You can watch the short video that’s embedded in this post – or you can watch the longer version, with commentary 🙂 on YouTube.
Here’s a previous bathroom makeover with tips on how to paint bathroom walls.
How long will Rustoleum painted cabinets last?
Watch this YouTube video with a 4 year update!
The amount of time that your Rustoleum Kit lasts will depend on the use and abuse it gets over time.
To make the paint last longer, add or keep hardware – knobs and pulls – and use them to open the drawers and doors. This keeps fingers from wearing away the finish and paint on the corners and edges.
Wipe up any splashes, spills, or drips immediately. Dried messes will require more scrubbing and will wear away at the finish.
Consider adding a polycrylic coat once a year to vulnerable areas. Follow tips in the cabinet touch up video, lightly sand the entire area and brush on a light coat.
Erin
Wednesday 6th of January 2021
Thanks for letting us include this in our bathroom vanity round-up post!
christine Hannemann
Saturday 19th of September 2020
This looks beautiful! I have used the Rustoleum Cabinet Transformations kits on 3 projects. I find it is very forgiving and extremely durable. It seems designed for novice painters, like me! Project 1. desk.- grey 2. bathroom cabinets -grey, 3. laundry room cabinets -white . Now I am ready to paint my kitchen in 2 tone - white and navy. . I wanted to see what the Nightfall blue looked like because the box samples are too tiny to really know. Your project turned out awesome and as most home improvement projects only you can see your own mistakes, but others hardly notice. Your tips to watch out for top coat drips was spot on. The topcoat does dry white and it shows more on dark colors. Good to know about the 3 coats of base for adequate coverage because I will need to buy more kits. I may reach out later with a few other questions - but thank you for your detailed posts. I love these insider tips!
FYI coloring tip - As far as the customizing the colors - when I had my kit tinted for the bathroom I asked to increase the pigment by 50% more than the desk and it turned out great. FYI brush tip - I had issues when I used a foam brush on the top coat. It left little pieces of black lint and I was horrified. Lesson learned - use the best brushes for best results!
Thanks again!
MARY C
Sunday 9th of August 2020
I have used this kit twice and love, love, love it. My first bathroom I did in grey/blue and glazed them. The second Bathroom I did in moss green and no glaze. Both are gorgeous, helpful hint : invest in really good brushes. I had no trouble with coverage or streaking and pooling on either project. Don’t use a foam roller! Getting ready to do a small bank of cabinets in my laundry room in the same blue used here.
Stephanie
Monday 31st of August 2020
Great suggestions- glad you've had good results with it too!
Sarah
Saturday 18th of July 2020
Beautiful results! I've been trying to find real life examples of these kits because colors are so dependent on lighting. I was wondering- in your opinion- is "nightfall" a true navy blue or more of a muted slightly gray blue? How would you describe it.
Stephanie
Monday 31st of August 2020
To me it's definitely navy - a dark navy, but gray.
Lori
Monday 6th of July 2020
This looks wonderful! What brand/color paint did you use? Also did you use the dark or light rustoleum? I want to do exactly what you did!
Stephanie
Monday 31st of August 2020
I used a dark kit - in their Nightfall color.