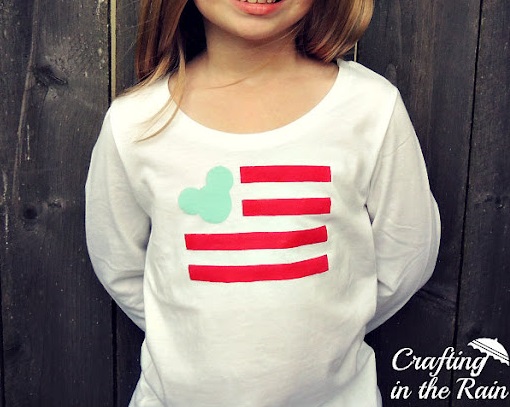
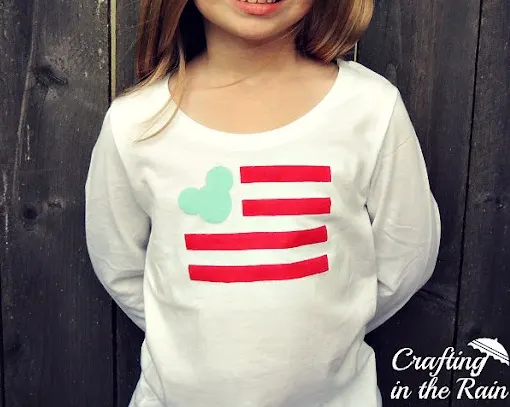
Make this 4th of July Mickey Flag Shirt to wear for your patriotic celebrations this year. And if you’re lucky, a holiday at Disneyland!

When I originally posted hits, it was already after the 4th of July – but that doesn’t mean that all things patriotic disappear. Especially if it has something to do with Mickey Mouse 🙂
It was originally a project for Undercover Tourist, so you can still see it over there too.
If you’ve done freezer paper stenciling before, this will all seem very familiar. If not, it’s so easy!
I’ll give you all the directions here, and then at the end of the post there’s a link where you can download an svg file for cutting the stencil with a Cricut or Silhouette, or even just print it out and cut it by hand.
** You could also make this with iron on vinyl. I did a lot of freezer paper shirts before I really broke into HTV **
Supplies for making a mickey flag shirt
- a shirt (white is best, and if it’s hot where you live, probably a short-sleeved one 🙂
- freezer paper (found near the plastic wrap and foil at the store…it’s like wax paper, but it’s only waxy on one side)
- fabric paint, or fabric medium mixed into regular acrylic craft paint
- foam brush
- iron and ironing board or EasyPress (learn about EasyPresses here)
Cut a freezer paper stencil with cricut
Wash and dry the shirt like normal.
Use a blue mat, or a used green mat to cut freezer paper.
When I am working with freezer paper, I put the non-shiny side down on my sticky mat to run it through my machine. The shiny side doesn’t stick as well to the mat.
So this means I always cut a mirror image of the stencil I want since I’ve put the freezer paper down “wrong side up.”
Choose the “Freezer Paper” materials setting, then send the design to cut.

Iron freezer paper to a shirt
Flip the stencil so the shiny side goes down on the shirt. Run a medium-hot iron over the freezer paper and the waxy side will stick to the shirt!
Press for about 15 seconds, let the paper cool, and try to lift a corner to see if it’s stuck or not. If it still lifts up, press another 15 seconds.
To apply freezer paper with an Easy Press, set the temperature to 350 and press for 20 seconds.
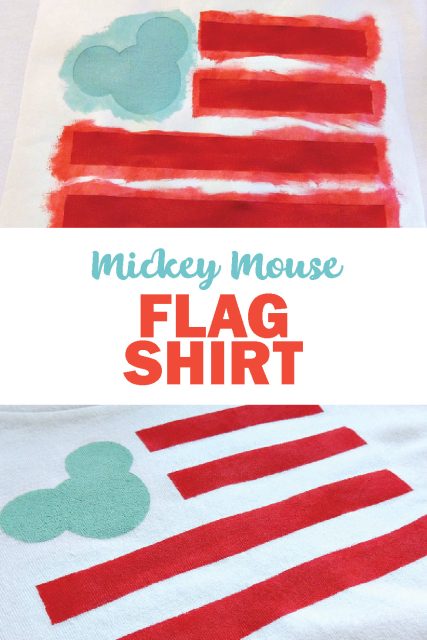
Paint freezer paper stencil on shirt
Slide a piece of scrap paper into the shirt in case paint seeps through–you don’t want spots on the back of your shirt! Paint the stripes red and the Mickey blue. Peel up the stencil and let the shirt air dry.
Then set the paint according to the instructions on the paint. Some bottles will say to run it through the dryer, for example.
Can a freezer paper stencil be reused?
No, because the waxy side as already melted and adhered to a shirt once. Also, the freezer paper may tear as you remove it from the shirt after the stencil has been painted.
You will need to cut a freezer paper stencil for each shirt you want to make.
Click here to download the svg file (which is a mirror image) or a document file (to print and cut by hand)
*Stencil measures about 4×6 inches but could be resized after you download it.

Read this post for more 4th of July SVG files.