• About
  • Contact
  • Shop
    • Facebook
    • Instagram
    • Pinterest
    • YouTube
  • Crafts
    • Disney
    • Kids
    • Sewing
  • Holidays
    • New Year
    • Valentine’s
    • St Patrick’s
    • Easter
    • Mother’s and Father’s Day
    • July 4th
    • Halloween
    • Thanksgiving
    • Christmas
  • Cricut
  • DIY
    • Cleaning
    • Organization
    • Projects
    • Scroll Saw
  • Downloads
    • Printables
    • SVGs
  • Recipes
  • Life
    • Family
    • Fashion & Beauty

Crafting in the Rain

Halloween Screens

Uncategorized

This post may contain affiliate links. As an Amazon affiliate, I earn from qualifying purchases. I receive a small commission at no cost to you when you make a purchase using my link.

2 Oct 2011
  • Share
  • Tweet
halloween images on window screen

Materials:
Window screen (I bought a roll of charcoal colored fiberglass screen at Home Depot for less than $7)
Stencil (I cut paper with my Cougar–you can use any diecut machine or even scissors to cut your design)
Foam brush
Paint
Frame (no glass or back needed)


Cut a piece of screen (I cut the fiberglass kind with regular scissors) a little larger than your frame size.


Place a paper towel down on your work surface, then layer with screen and then stencil.  You can use a bit of tape to secure the stencil to the screen.  


Brush paint onto the screen–you don’t need a lot of paint as you’re not trying to fill in each of the tiny spaces.  Lift up the stencil and let paint dry.

When paint is dry, attach the mesh to your frame.  I used hot glue and pressed it down into the inside edge of the frame.  


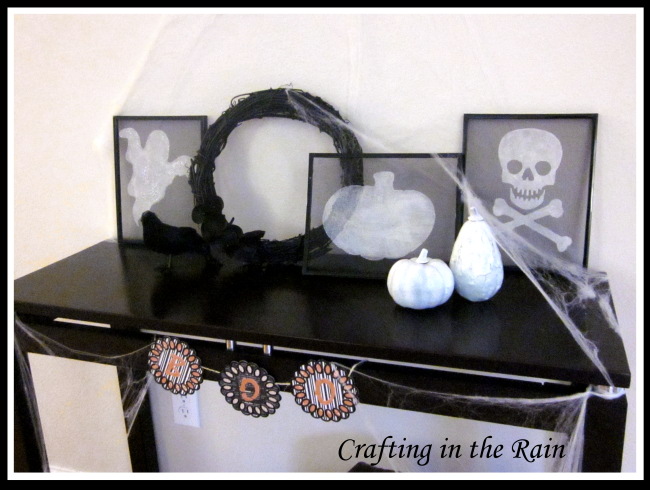
Here they are all displayed on my entry table.   We don’t have a mantel in our house, but I love that I can decorate this one table, and then anyone who visits our house will see it.  I don’t even have to decorate the whole house and I still feel festive.

Halloween Entry Table on Crafting in the Rain


In addition to the screens I have a Dollar Tree crow, some white painted pumpkins and a black wreath.  It was inspired by one I saw at Target and I simply spray painted a twiggy wreath black, made some spiral paper roses with black beads in the middle and glued them to the wreath.  I opted to only cover a small section with the paper roses.  I’ll tell you that it was so the creepy-twisty-twiggy-ness of the wreath would be seen, but really it was because I didn’t want to spend the time covering the whole thing!

So what about you–are you a whole-house decorator?  Or do you have one sweet spot that you focus on?

Image Map

Visit thecsiproject.com

Related Posts:

  • Halloween Word Game Printable

Leave a Comment

« Chalkboard Shopping List (and a new frame)
Chalkboard Posterboard Take 2 »

Leave a Reply Cancel reply

Your email address will not be published. Required fields are marked *

This site uses Akismet to reduce spam. Learn how your comment data is processed.

Hi, I'm Stephanie - Welcome to Crafting in the Rain where I've been blogging about the crafty life since 2011. Read More…

Archives

  • Home
  • About
  • Contact
  • Disclosure
  • Index
  • Privacy Policy

Stephanie Paxman is a participant in the Amazon Services LLC Associates Program, an affiliate advertising program designed to provide a means for sites to earn advertising fees by advertising and linking to amazon.com.

Copyright © 2011-2023 Crafting in the Rain