• About
  • Contact
  • Shop
    • Facebook
    • Instagram
    • Pinterest
    • YouTube
  • Crafts
    • Disney
    • Kids
    • Sewing
  • Holidays
    • New Year
    • Valentine’s
    • St Patrick’s
    • Easter
    • Mother’s and Father’s Day
    • July 4th
    • Halloween
    • Thanksgiving
    • Christmas
  • Cricut
  • DIY
    • Cleaning
    • Organization
    • Projects
    • Scroll Saw
  • Downloads
    • Printables
    • SVGs
  • Recipes
  • Life
    • Family
    • Fashion & Beauty

Crafting in the Rain

Drawstring Toy Bags

Kids· Organization

This post may contain affiliate links. As an Amazon affiliate, I earn from qualifying purchases. I receive a small commission at no cost to you when you make a purchase using my link.

19 Jun 2013
  • Share
  • Tweet

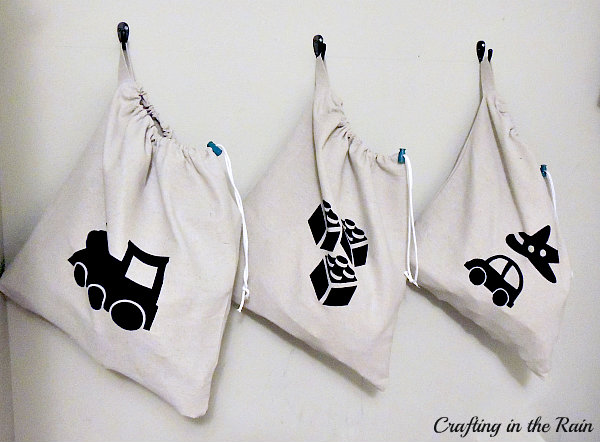
I know I’m not the first person to struggle with toy storage. Just Google the topic and you’ll find loads of  ideas. The trick is finding what works for you and your kids!  I made these a few months ago and shared them at Craftaholics Anonymous

So far these drawstring canvas bags have been perfect because they hold a lot of stuff and they’re out of the way while still being accessible. Plus clean up is a breeze.  

I chose drop cloths because the canvas is pretty cheap, and it’s nice and sturdy.  It’s a  great neutral color that would go with any decor, and they can be dressed up more if you want.


Here’s what you’ll need for 1 bag: 
  • Canvas drop cloth for bag: cut to 18 in x 38 in
  • Canvas for loop: cut to 3 in x 6 in
  • Thin cording 1 yard (can be found on spools at JoAnns)
  • Cord lock for holding the bag closed when cord is cinched.  (I purchased mine from Oregon Cord Lock–no affiliation, but I found them to have great color options and prices, I used the mini locks in teal)
  • Optional: Paint, stencils, or heat transfer vinyl,  for labeling the bag


Create a hanging loop by folding small canvas piece in half the long way {so that it measures 1.5 in x 6 in} and sewing a 1/2 inch seam along the longest edge.  Turn inside out (one of these loop turner tools comes in very handy) 
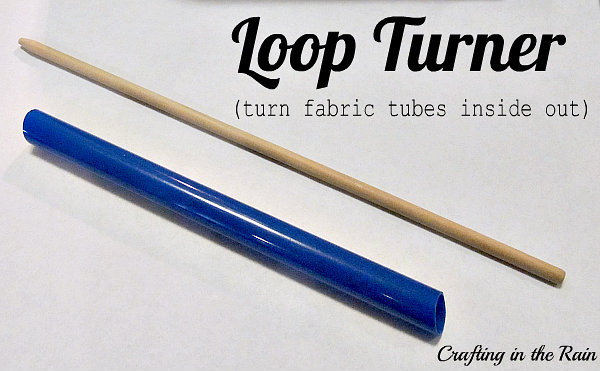


 then iron flat.

Fold bag fabric in half {so that it measures 18 in x 19 in} and the 18 inch sides line up


1–With the fold towards you, fold down the right hand corners at a slight angle {both layers}, about 2 inches down, and iron. Then sew the folds in place. {refer to image 1 above}  The angled red lines are where you will sew the folds, and the straight red lines are where you’ll sew the side seam in Step 3 below.
2–Take the sewn loop fabric, fold in half, and pin inside the left seam of the bag, about 2 inches down, lining up raw 
edges.
3–Sew bag’s side seams with 1/2 inch seam.  On right side, follow red line straight up so an opening remains at the top. Zigzag stitch the raw edges of both side seams as well as the top raw edges to prevent unraveling.
4–Fold the top raw edge down 1 in and sew at 1/4 in from zigzag edge to create casing.
Finish the ends of the cord using a flame, fray check or clear nail polish. Then thread cord though the casing by attaching a safety pin to one end and pushing it through.
Once both cord ends are out, insert through a cord lock.  Tie the ends in a square knot.
 
At this point you can label the bag any way you like, or not at all.  I chose images to make stencils from freezer paper. I ironed the freezer paper stencils shiny side down to stick to the fabric and then painted with regular acrylic paint. {fabric paint works great too.}  Before you paint or stencil your bag, make sure to put a piece of paper inside the bag where you’ll be painting. This prevents paint from seeping through.
 
Finally, I hung 3 hooks in my son’s closet (using drywall anchors for each one of the screws) so the toy bags are accessible but off of the floor.
 
These could also be great if you have summer travel coming up.  Let me know if you have any questions, and if you make some too I’d love to see them!  Share and I’ll add your link to this post 🙂
 
Wondering what to do with the leftover drop cloth?


Image Map

Leave a Comment

« Campus Book Rentals
Painted Princess Beads »

Leave a Reply Cancel reply

Your email address will not be published. Required fields are marked *

This site uses Akismet to reduce spam. Learn how your comment data is processed.

Hi, I'm Stephanie - Welcome to Crafting in the Rain where I've been blogging about the crafty life since 2011. Read More…

Archives

  • Home
  • About
  • Contact
  • Disclosure
  • Index
  • Privacy Policy

Stephanie Paxman is a participant in the Amazon Services LLC Associates Program, an affiliate advertising program designed to provide a means for sites to earn advertising fees by advertising and linking to amazon.com.

Copyright © 2011-2023 Crafting in the Rain