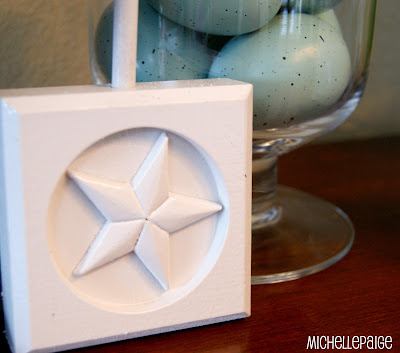
Welcome to March’s Make a Splash! You know, I didn’t even know what these little decorative moulding squares were called until I decided to use them for this month’s mystery item.
| Source |
Wall Hook
Hi there! I’m Aimee Lane from It’s Overflowing and I’m so glad Steph invited me to participate in Make A Splash! I love all things DIY and home decor and so when I heard the mystery challenge this month would be rosettes I was totally stoked! For a couple months I’d been planning on making a hook into a piece of art for my little girl’s room. I love organization and figuring out what she was going to wear on schooldays was becoming total chaos, I figured if we had a plan the night before it may make life a little easier! I love the hook I came up with and it looks real cute in her room! We’re in the middle of transitioning her from her baby girl pink room to a room with a bit more splash of color! I’m hanging on to some neutral in there by incorporating black and white into the design as well. My house tour shows her room’s ” before” pics. Soon I hope to add some “after” pics {if the two of us can figure out a good compromise}.
What a great idea–I love that it’s useful and cute! (the dots on that knob are perfect)
Banner Stands
Using 2 wood ‘star’ corner blocks (with a 5/16th hole drilled in the top), a 4 foot dowel cut in half and a can of white spray paint…I crafted up some banner stands. Who says you have to have a mantle to hang a banner? These banner stands can be moved anywhere and I can put different lengths of dowels into the blocks depending on the height I need. Simple and easy. Thanks for the challenge!
How fun! This a great way to show off a banner for any holiday or party.
I love the black and white combo here–the whole thing looks so modern now!
Bullseye Lamp
Wood rosettes? Wood rosettes??? What in heaven’s… don’t get me wrong. I like a good challenge as much as the next guy. I like to use all kinds of medium in unexpected ways. But I’ve never given an ounce of thought to wood rosettes. I was very tempted to paint them fun colors, let my kids go wild, and call them “decorative architectural building block fun”… but I dismissed that quickly. My next thought was a vase… but it didn’t seem quite right… as I searched my brain, my eyes fell on the unused lamp I’d purchased on the super cheap from Walmart and then painted for my son’s room. I’d created a shade to match the theme of the bedroom and the entire thing sits down in the basement gathering way too much dust. And so was born the:
Everything for this lamp redo I had on hand – except for the rosettes of course! Although this was a project that took a different direction than I’d originally planned, I ended up with a lamp I will actually use – in our dining room and NOT our basement! – which I’m happy about. If I had it to do again, there are definitely things I’d do differently, but all in all I think branching out with an unlikely crafting element paid off! Come by bugaboo, mini, mr & me for the full tutorial! Thanks for letting me participate, Steph! What fun it was!
Were you inspired then? Think you’ll use these in one of your next projects? Thanks so much again for stopping in this month and thanks to my participants for their great projects. If anyone will be “pinning” these, please click over to the creator’s blog to pin from the original source. They’ll love you for it 🙂 You can see all past projects on this page.
And anyone else who wants to do a challenge, leave me a comment and let me know. I have spots open starting in the summer!


